In this series of posts, I’ll be providing tips that show how to do something in both AutoCAD and BricsCAD, hence A & B.
The Series
The idea behind this series is to provide useful information for several sorts of reader:
- AutoCAD users.
- BricsCAD users.
- People in the process of transitioning from AutoCAD to BricsCAD and who need to know what to do differently (if anything).
- People considering transitioning from AutoCAD to BricsCAD and who want to know about the differences and similarities.
Why might you need a polyline?
In my last post (A & B Tip 5 – polyline areas) I described different methods of finding the areas (and perimeters) enclosed by polylines. That’s all well and good, but what if the objects that enclose your area aren’t nice convenient polylines? This post will help you make some. There are other reasons you might want polylines rather than whatever you have now. These include:
- You can offset a polyline in one go rather than offsetting multiple objects and then joining them together.
- You can apply fillets to a whole polyline with a single pick rather than lots of them.
- A polyline can be extruded to make a 3D solid (or hole).
- You can use a polyline to define a path that is used to extrude or sweep another polyline to make a solid with automatically mitred corners.
- You can apply a width to a polyline and override that width for individual segments.
- You can use a polyline as the basis to create a region, which allows you to do various cool things such as perform boolean operations on 2D objects.
- Using polylines to define a hatch boundary can be less error-prone than using individual objects.
- You can locate the geometric center of a polyline with the GCE object snap.
- A polyline’s linetype can be persuaded to flow around the whole polyline rather than being confined to individual segments. In some cases, this means you will see a linetype where you would otherwise see only solid lines.
Having established various uses for polylines, and assuming you already have some objects and don’t want the tedious job of drawing over them manually, what can you do? Read on.
Note: in this post, the operations are exactly the same in both AutoCAD and BricsCAD with a couple of minor exceptions that I will point out as I go along.
PEDIT Join
If you’re fortunate enough to have a series of lines, polylines and/or arcs that are connected end-to-end without overlap to exactly define the area you want, then you can use the PEDIT command’s Join option to convert those objects to a single polyline. The command sequence dates from the mid-80s and is rather convoluted:
Command: PEDIT

Select polyline or [Multiple]: [pick an object]

Object selected is not a polyline

Do you want to turn it into one?  [Enter] (this only appears if you pick a line or arc)

Enter an option [Close/Join/Width/Edit vertex/Fit/Spline/Decurve/Ltype gen/Reverse/Undo]: J

Select objects: [select a bunch of objects]

Select objects: [Enter]

X segments added to polyline

Enter an option [Close/Join/Width/Edit vertex/Fit/Spline/Decurve/Ltype gen/Reverse/Undo]: [Enter]
Note that the Do you want to turn it into one? prompt can be suppresses if you set PEDITACCEPT to 1. It’s also worth noting that if the properties of the objects vary, then the properties of the first-selected object will be used for the resultant polyline.
If you do a lot of this kind of operation, then it can be made more efficient using a menu macro. Some of us even made commands in LISP to simplify matters. A few releases ago, Autodesk did that for us when it added the JOIN command. BricsCAD followed suit to maintain command compatibility. This command joins various things in various ways, and one of those ways involves creating a polyline.
JOIN
The JOIN command, when applied to the same kind of convenient end-to-end objects described above, performs the same task as PEDIT Join, but with fewer prompts. Why not use it all the time then? Because sometimes it doesn’t work (in AutoCAD, at least). See the video for an example.
Video – PEDIT Join and JOIN in AutoCAD and BricsCAD
BOUNDARY
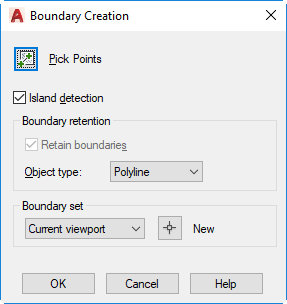
The BOUNDARY command, unlike the joining commands above, does not require that the objects lie conveniently end-to-end. Any group of objects that form an enclosed area can be used to create a closed polyline. Also unlike the joining commands, the existing objects are not converted to a polyline. Instead, a new polyline is created on top of the existing objects. The current properties (layer, etc.) are used to create the new polyline.
Assuming you’ve set your current properties to match the objects you want to create, invoke the BOUNDARY command (short form BO). A dialog will appear. There are minor differences between the AutoCAD and BricsCAD dialogs, but nothing that need concern us here.
 |
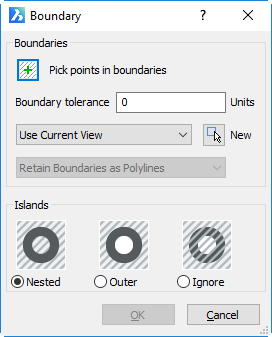 |
Just pick the button at top left and start picking inside bounded areas. When you’re finished, press Enter and you’ll be left with a bunch of closed polylines. This video shows how it’s done.
Video – BOUNDARY in AutoCAD and BricsCAD
Finally, you can cut out the dialog box altogether and go straight to picking points if you use the command-line version, -BOUNDARY (note the leading hyphen). Just enter -BO, pick pick pick, Enter and you’re done.
be sure to save before running BPOLY or boundary commands that flood fill areas. They lock up occasionally. Also if an area will not resolve with BPOLY, try zooming out and running again. Its voodoo, but sometimes works.
Good points. I remember providing the apparently counter-intuitive zoom-out advice back in the Release 12 era when it was introduced!
Both those points also apply to HATCH
Steve, you can’t leave me hanging like this!
” In some cases, this….” (last bullet point under “Why might you need a polyline?”)
In some cases, what??? The suspense is killing me!!
Also, I thought you could include the utility of the PEDITACCEPT sysvar in this post:
Autodesk Civil 3D Help: PEDITACCEPT (System Variable)
https://help.autodesk.com/view/CIV3D/2019/ENU/index.html?guid=GUID-ED35EB02-53AD-4725-97DD-346C7E01974D
Ha! Thanks for pointing both of those things out. I’ve adjusted the post accordingly.
Cheers, I really appreciate this kind of feedback!