Tag Archives: Programming

How to sign your LISP files

This post follows on from Why digitally sign your LISP files? and How to obtain a digital signature to sign your LISP files.

In the first post, I explained why you might want to digitally sign your LISP files. In the second, I explained how to obtain and install a digital signature. This third and final post in the series assumes you have done all that and now want to sign your files. There are two methods available to you, using a dialog box or command-line interface.

Signing LISP using the AcSignApply.exe dialog box

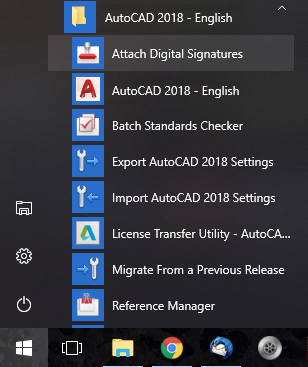
Autodesk has provided a utility called Attach Digital Signatures for years. This was provided to sign drawings, zip files, etc., but the ability to sign LISP files was added in AutoCAD 2016. Don’t go using the 2015 version or you’ll have a very frustrating time! You can invoke this utility using the Windows Start Menu:

You can also make your own desktop shortcut if you like. The executable is stored at (XXXX is your AutoCAD release number):

C:\Program Files\Autodesk\AutoCAD XXXX\AcSignApply.exe

AutoCAD doesn’t need to be running when you start the application. Here’s the interface:

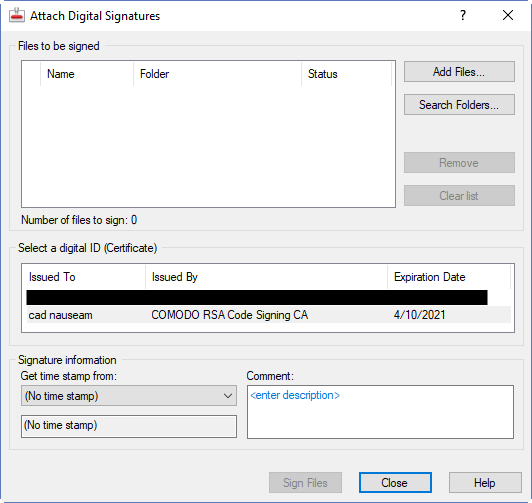
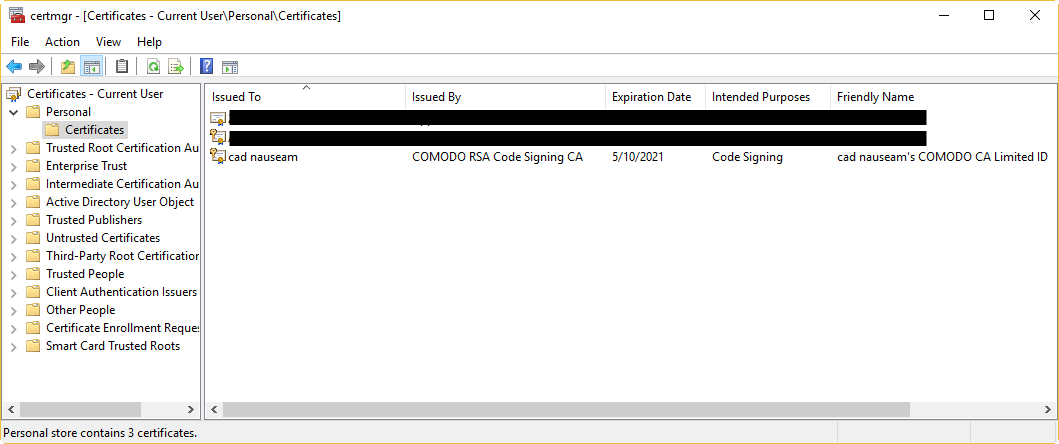
Half way down, there is a list of code signing certificates that you can use. You should see the one you obtained and installed earlier in this list. If you don’t see it listed it may not have been installed correctly. It’s possible to install a public key version of a certificate and see it listed in the Windows Certificate Manager, but that won’t help you sign code. You need to install the private key version in order to be able to sign things. If you do the wrong kind of export from your browser, or if you use the wrong browser to obtain and export the certificate, you may have installed the public key version. In such a case, you will need to contact the certificate provider for help. I have found that the online chat help provided by Comodo is excellent in such cases. Yes, I know this because I got it wrong the first time!

Assuming your certificate is visible, click on that line to select it. You can add files to the pane at the top left using the buttons on the right side or by simply dragging and dropping files onto the pane from Explorer. But wait! Before you do that, make sure you have a safe unsigned copy of all your files. Applying the signatures is a modification process; you are left with only the signed version of the files.

LISP files with the LSP, MNL, FAS, or VLX file extensions can be selected and dragged into the pane. As mentioned in the first post, there’s a bug in the original iterations of AutoCAD 2016 and AutoCAD 2018 that prevents signed VLX files from working, so I would advise against creating them. If you need to distribute signed DCL-based code and don’t want the LISP source visible, you will need to provide a signed FAS instead, along with a DCL file that’s either provided alongside the FAS or created on the fly by your code. Yes, this is a pain.

Note that at the time of writing, you can’t sign CUI, CUIx, DVB, JS, PGP and SCR files.

Once you have selected the certificate to use and the files to sign, select a source for the time stamp and enter a description in the Comment box (optional). Pick the Sign Files button and you’re done.

Signing LISP using the AcSignTool.exe command-line utility

This utility isn’t provided with AutoCAD, but you can download it here. It doesn’t require AutoCAD, which means you can sign LISP files even if you don’t have a copy of AutoCAD 2016 or later.

Once you have downloaded and unzipped the file, place the files somewhere handy. If you make a shortcut to cmd.exe that starts in that location, you can run this command to see all the options:

acsigntool.exe /?

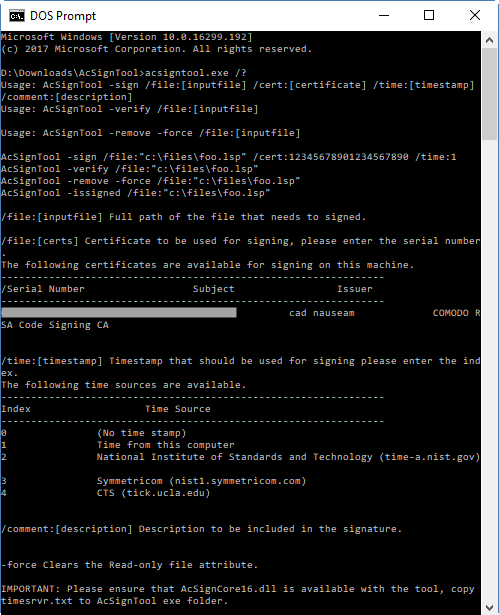
Usage is usually as follows:

AcSignTool -sign /file:[inputfile] /cert:[certificate] /time:[timestamp] /comment:[description]

Here’s an example:

AcSignTool -sign /file:"X:\ToSign\MyCode.lsp" /cert:abcdef1234567890 /time:1 /comment:Hello

The resultant file should be the same as with the dialog box interface. If it’s a raw LISP file, a large comment like this will be placed at the bottom of the file:

;;;-----BEGIN-SIGNATURE-----
;;; /gcAADCCB/oGCSqGSIb3DQEHAqCCB+swggfnAgEBMQ8wDQYJKoZIhvcNAQELBQAw
;;; IE1hbmNoZXN0ZXIxEDAOBgNVBAcTB1NhbGZvcmQxGjAYBgNVBAoTEUNPTU9ETyBD
;;; CwYJKoZIhvcNAQcBoIIFQzCCBT8wggQnoAMCAQICEQCyNMZT2aa05avqeC3j+F3p
;;; YQBuAGQAYQByAGQAcwAgAGEAbgBkACAAVABlAGMAaABuAG8AbABvAGcAeQAgACgA
;;; MA0GCSqGSIb3DQEBCwUAMH0xCzAJBgNVBAYTAkdCMRswGQYDVQQIExJHcmVhdGVy
;;; QSBMaW1pdGVkMSMwIQYDVQQDExpDT01PRE8gUlNBIENvZGUgU2lnbmluZyBDQTAe
;;; bnB31gkc9o/M8YjPdGVjQG0VS96RVf/WtkmGugV2n1Fv4wWXBLA7n410yglqSZh9
;;; NOK2Ya1KFx4trccIHV1oAFN+BCKzSf6J/HdVkmCcy4TEPcrxSzZsi//slm2o9EHl
;;; mwdm6Quhw1wMT8+iRmJNO4ofwuKfBwyE28ZIK4q+zorJPNwiK2o43CmNJViU5SQD
;;; M9ImVtHTTtdAR1Iln+wEtg/4xgwj5KWuxoUJ22OJ/K0A8IcnxqGBujCBtwYDVR0O
;;; Fw0xNzEwMDQwMDAwMDBaFw0yMTEwMDQyMzU5NTlaMIGAMQswCQYDVQQGEwJBVTEN
;;; MAsGA1UEEQwENjE1NTELMAkGA1UECAwCV0ExEjAQBgNVBAcMCVdpbGxldHRvbjEV
;;; A1UdHwQ8MDowOKA2oDSGMmh0dHA6Ly9jcmwuY29tb2RvY2EuY29tL0NPTU9ET1JT
;;; QUNvZGVTaWduaW5nQ0EuY3JsMHQGCCsGAQUFBwEBBGgwZjA+BggrBgEFBQcwAoYy
;;; aHR0cDovL2NydC5jb21vZG9jYS5jb20vQ09NT0RPUlNBQ29kZVNpZ25pbmdDQS5j
;;; MYGvBIGsOAAyADsAMgAvADEAMAAvADIAMAAxADgALwA4AC8AMgA2AC8AMQA3AC8A
;;; TgBhAHQAaQBvAG4AYQBsACAASQBuAHMAdABpAHQAdQB0AGUAIABvAGYAIABTAHQA
;;; dABpAG0AZQAtAGEALgBuAGkAcwB0AC4AZwBvAHYAKQAAAA==
;;; -----END-SIGNATURE-----

Because it’s a comment, it will be ignored by AutoCAD releases prior to 2016, and by other AutoLISP-compatible CAD applications such as BricsCAD and ZWCAD.

References:
Signing your application modules for AutoCAD 2016 – Part 1 – Kean Walmsley
Signing your application modules for AutoCAD 2016 – Part 2 – including various other references
To Digitally Sign an AutoLISP File – Autodesk Knowledgebase article

How to obtain a digital signature to sign your LISP files

In an earlier post, I explained why you might want to digitally sign your LISP files. If you decide to go ahead with that, then this post explains how you can obtain and install the digital signature you will need to sign your files. This is the most difficult part of the process and it involves spending money.

Getting a digital signature

Although you can make your own digital signature (there’s an Autodesk Knowledgebase article describing the process), there’s little point in doing this. You can sign your files, sure, but that signature won’t be seen as trusted by software that checks for it. Anybody can create a signature like that, including one that impersonates you, and it doesn’t prove anything. The only purpose for such a home-made signature would be to test the methods you’ll be using to apply a proper trusted signature later.

Edit: if you do want to make your own signature, BlackBox informs me that the MakeCert tool in the Windows SDK mentioned in the Knowledgebase article is deprecated. He suggests using this PowerShell Cmdlet instead.

You’re going to need a signature that is trusted. That means you’re going to have to pay somebody trustworthy to trust you. There are a set of certifying authorities, trusted by Microsoft, Autodesk, etc. who can issue code signing certificates to companies and people. You need to prove who you are to one of those authorities and pay them to certify that you are who you say you are. So before you start, make sure you or your business are visible in terms of directory listings, publicly visible phone numbers, etc. If you are representing a company asking for a certificate, you can expect to be asked to produce evidence that you really represent that company. You can expect to confirm that your email and phone number are really under your control.

You only need to do this once a year, or even once every several years if you pay in advance. You might find that the evidence you need to provide changes at renewal time; for example a Yellow Pages listing that was OK in 2015 was no longer accepted when I renewed in 2017, so I had to register my business with another listing.

In my search for a certifying authority, I found that K Software, a reseller for Comodo, was the cheapest source for a code signing certificate, see here. An OV certificate will be fine for signing LISP.

K Software takes your money (USD $67 to $84 a year depending on the length of time you need), gets Comodo to provide the certificate, and provides a handy tool (KSign) that allows you to simply apply the certificate to various files without some of the messing about that’s otherwise required. It’s not useful for LISP files, though. Comodo also provides the support, and I’m happy to report that in my experience their customer service is excellent.

Note: it’s important that you pay close attention to the instructions when applying for your certificate. For example, the browser you use to apply for the certificate is vital. Choose one that’s suggested (e.g. Firefox) and which you expect to use later to obtain the certificate.

Installing a digital signature

Once your evidence is accepted and your payment has gone through, you will be sent an email with a special code, allowing you to obtain the certificate. It’s important that you’re using the same browser on the same computer that you used when applying for the certificate.

Once you click the link and obtain the certificate, you’ll want to export it. In Firefox 58.0, use Options > Privacy & Security and scroll to the bottom to see View Certificates. Select the certificate and pick Export. This will create a .P12 file that you can back up and install on this or another computer. To install the certificate, double-click the .P12 file and follow the prompts to assign it to the current user in the default location (Personal).

That’s it. You should now have a certificate installed that you will be able to use to sign LISP and other files. To check this, start the Windows Certificate Manager (C:\Windows\System32\certmgr.msc). Have a look in Current User > Personal > Certificates and you should find your newly installed certificate.

The next post in this series will explain how to apply this digital signature to your LISP files. That’s the easy bit.

Why digitally sign your LISP files?

After I mentioned in an earlier post that I had digitally signed the sample LISP file I had provided, this generated some interest. In this post, I’ll explain why you might want to sign your LISP files. In a later post, I’ll explain how to do it.

These days it is standard practice for developers to digitally sign their code. Operating systems and applications are displaying increasingly scary warnings when coming across unsigned code. Here is an example of the sort of message you get when you load an unsigned LISP file into AutoCAD from a location that has not been explicitly configured as a trusted location:

If you’re a CAD Manager dealing with your own internal code, it’s not too onerous to configure AutoCAD in Options > Files such that a folder is trusted by AutoCAD and place your code in there. The folder should be read-only; if it isn’t, AutoCAD warns you when you try to configure it. If you do this, the scary warnings don’t appear to bother and confuse your users, even if your code is unsigned.

Another way a CAD Manager can avoid the warnings is to set the SECURELOAD system variable to 0. That’s generally not recommended because it turns off AutoCAD’s security features. While you’ll probably get away with this, there’s always a chance that a user will load some malware and then you’ll have to explain yourself to management.

If you’re not just using your code internally and it’s going to be used by other parties, then you’re not going to have that level of control over the user environment. In recent AutoCADs it’s possible to set up the installation deployment such that users can’t turn off the security settings. If the CAD Manager at the location using your code has done this, your potential users are going to be presented with unprofessional-looking scary warnings.

If you sign your code, users might still get a warning, but it’s less scary. It identifies you as the verified source of the code so they will have more confidence in picking the Always Load button. Once they’ve done this, other signed code of yours will be automatically trusted.

There’s another important reason you might want to sign your code, and that’s protection against other people’s modification of your code. If somebody edits your LSP file and then gives it to someone who tries to load it, the user is presented with an even scarier warning:

Note that this warning no longer has your name on it. This means it’s possible to protect yourself from people (internal or external) who well-meaningly hack about with your code and then try to blame you when it goes wrong. It also gives a level of protection against your code being infected by malware.

Note that all of the above only applies to AutoCAD 2016 and later. AutoCAD 2014 introduced some LISP loading security measures, but the signature stuff came a couple of releases later. Earlier AutoCAD releases, along with compatibles such as BricsCAD and ZWCAD, will just ignore the digital signature. It’s just a comment in the code as far as they’re concerned.

LISP files with the LSP, MNL, FAS, or VLX file extensions can be digitally signed. There’s a bug in the original iterations of AutoCAD 2016 and AutoCAD 2018 that prevents signed VLX files from working. This was patched later in both releases (2016 SP1 and 2018.0.2), but if you’re distributing your code externally there’s always a chance that your VLX might end up in the hands of somebody using a broken release. Also, VLX files that are digitally signed cannot be loaded into AutoCAD 2015 and earlier, broken or not. You should bear that in mind before distributing signed VLX files. I don’t do it and would advise against it. Thanks, Autodesk.

Given this information, if you decide that signing your LISP is a good idea, watch this space for information on how to do it.

Setting your application or document window size using LISP

I intend to produce a few videos containing tips, tutorials, product comparisons and the like. I’ve set up a cad nauseam YouTube channel, but don’t bother visiting it yet because it’s empty.

One of the things I need to do for these videos make sure I’m capturing the screen at an appropriate resolution. I knocked up a bit of Visual LISP to take care of this task quickly and accurately, and you might as well have it. It’s a simple routine that allows you to accurately size either the main AutoCAD application window or the current document window (drawing area) within the main window.

The file is WindowSize.lsp. It should work in all full AutoCAD releases (not counting LT and AutoCAD for Mac) and AutoCAD-based verticals from 2000 on.

It works in recent BricsCAD releases (except the free and LISPless BricsCAD Shape). I’ve only tested it in Windows, but it should also work in the Mac and Linux versions due to the high degree of LISP compatibility provided even across platforms. It also works in ZWCAD 2018 for the main application window, but don’t use it on the document window because that doesn’t work.

Download it, put it in a location of your choice and load it into your CAD application (for example by dragging and dropping it from Explorer onto the drawing window).

Note: In AutoCAD 2014 and later, loading any LISP or other executable file may result in a warning depending on the release, the security settings, whether the file is located in one of AutoCAD’s trusted locations, and whether the file is digitally signed. I’ve digitally signed the file to reduce the incidence of warnings, but you could still see something like this:

The verified publisher should be cad nauseam as shown above. If you pick Always Load then you shouldn’t see the warning again for this file or any others signed by cad nauseam. Feel free to edit the file for your own needs, but if you do the signature will become invalid and you’ll be warned again when loading the file.

Once it’s loaded, enter the command WindowSize. The prompt sequence goes like this:

Command: WINDOWSIZE
Window to size [Application/Document] :
Width in pixels <1280>:
Height in pixels <720>:

Now, back to work on the first of those videos.

My first computer

My first computer was a Dragon 32, which I think I bought in 1982. With a massive 32 kilobytes of RAM and a proper typewriter keyboard, it was quite advanced for a home computer of the time. The Commodore 64 may have had more RAM, but a lot of it was grabbed by its very basic BASIC. I preferred a computer with an ELSE to go with its IF, thanks. Microsoft Extended BASIC for me, not the crummy old BASIC 2.0 of the Commodore. The Commodore 64 was one of the great consumer electronics sales successes of all time. The Dragon, er, wasn’t. It lasted less than two years before the Welsh parent company went under.

Inside, it was pretty much a Tandy TRS-80 Color Computer. Outside, it was this:

Dragon 32

I cut my coding teeth on this beast. The first thing I did with it was to write a parametric 3D bottle design program. I later spent several all-nighters developing what I thought was an awesome space game in BASIC using its limited graphics. I bought a plug-in cartridge that provided me with assembly language facilities. Real nerd stuff.

I sold it to a co-worker just before the company collapsed and replaced it with a Sinclair QL, another great commercial success story. I still have that QL (broken), and another one I bought much later as a replacement. I must get it out one day and see if it still works.

What was your first computer?